The word makes beginners nervous: Steek. It sounds like scissors, like irreversibility, like the one knitting mistake you really can’t undo. But Steeks are one of the most elegant and logical concepts in knitting – and with the right preparation, no reason to fear, but a tool that fundamentally simplifies knitting colorwork and Cardigans.
This article explains what Steeks are, why they work, which yarns are suitable, what reinforcement methods exist, and how to proceed step by step. After this article, you will understand why Steeks are less a risk and more a gain in freedom.
What is a Steek?
A Steek (literally: cut or slit edge) is a deliberately created area in the knitted piece that is cut open later. Classic in knitting in the round: You knit the entire Sweater or Cardigan as a tube – body, armholes, neckline – all in the round, without having to knit flat. Then you cut the openings.
Why would you want that? The answer lies in colorwork.
Stranded Colorwork – Stranded Colorwork and Fair Isle patterns with two or more colors – is much easier to knit on the right side of the piece than on the wrong side. When knitting in the round, you always see the right side. When knitting flat, you have to work the pattern mirrored on the wrong side and on the left side – which is more challenging and error-prone for many Knitters.
The solution: knit in the round, even if the finished piece needs openings – and open these openings afterward with a clean cut. That is the Steek.
Why does wool hold when cut?
The obvious question: If you cut a knitted piece, won’t it unravel?
The answer is: It depends on the wool – and on the reinforcement.
Wool felts. The natural scale structure of the wool fibers interlocks. This is usually a problem (Sweater shrunk in the machine) – but in Steek knitting, it’s a crucial advantage: The fibers hold together on their own, especially when the wool is not Superwash-treated.
Non-Superwash wool (like Rauma Finull or Istex Léttlopi) is ideal for Steeks: The fibers cling together at the cut edge and hardly fray. After securing and cutting, the edge remains stable, even with repeated handling.
Superwash-treated yarns do not have this natural grip – the scales have been chemically removed so that the wool is machine washable. This means that Steeks in Superwash yarns require additional reinforcement. It’s possible – but more demanding.
Cotton, Linen, and Silk yarns are not suitable for Steeks: these fibers do not felt and would fray at an unsecured cut.
Which yarns are suitable for Steeks?
The golden rule: "sticky" (grippy) and not superwash. What matters is not how tightly the yarn is twisted – on the contrary: very tightly twisted, smooth yarns can slip out of the stitches. What you need is "toothy" wool: fibers with an open scale structure that interlock like Velcro.
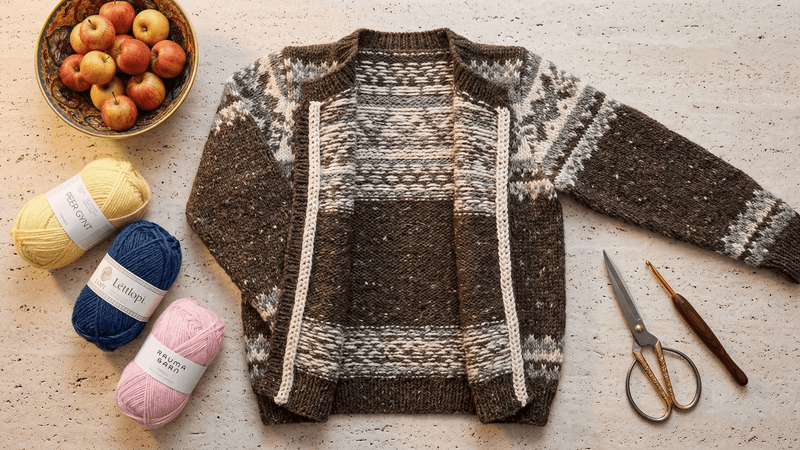
Rauma Finull is the classic Steek yarn. The Norwegian Fingering yarn is not superwash and has exactly this grippy, "sticky" quality – the fibers adhere so well at the cut edge that experienced Knitters sometimes completely forgo mechanical reinforcement. Rauma Finull is the first choice for Stranded Colorwork Cardigans.
Istex Léttlopi is also excellent for Steeks. Icelandic wool is naturally hairy and grippy – the fibers interlock and keep the cut edge stable. Traditional Lopapeysa patterns almost always work with Steeks.
Sandnes Peer Gynt: The Norwegian DK yarn is not superwash and has good grip – also very suitable for Steeks, especially for Stranded Colorwork Cardigans in DK weight.
Not ideal, but possible: KFO Merino is not superwash but has a medium twist – with double mechanical reinforcement (machine stitching or double crochet edge) it can also be used.
Superwash yarns (like Malabrigo Rios): Only with machine stitching or a very tight crochet edge. Never attempt an unsecured or lightly secured Steek in Superwash Wool – the lack of scale structure means the stitches at the cut edge have no natural hold and can unravel immediately.
Clearly not suitable: Cotton yarns, Linen yarns, Silk yarns.
The four methods for securing Steeks
Before you cut, the Steek must be secured. There are four common methods:
Method 1: Crochet Edge (Crochet Reinforcement)
The most widespread method. You crochet together two stitches to the left and right of the planned cut line using a thin crochet hook and a sturdy, thin yarn. The crochet chain catches the stitches and prevents them from unraveling.
Important: Use a Non-Superwash fingering yarn for the crochet line – it “grips” the wool of the knitted piece and holds much better than a smooth Superwash yarn. Tip for beginners: Use a contrast color for the crochet chain. This makes the “path” for the scissors much more visible and gives you confidence when cutting.
Step by step:
– Insert crochet hook at the right edge of the Steek zone – Join two stitches (right side and left side of the Steek) together with a chain stitch – Crochet row by row upwards – Repeat the same on the other side of the Steek zone – Cut in the middle between the two crochet rows
This method is particularly neat and also gives good results with Superwash yarns.
Method 2: Machine stitches
Two rows of straight stitch with the sewing machine, left and right of the cutting line, directly through the knitted piece. Then cut between the seams.
This method is especially suitable for Superwash yarns and for knitters who have no crochet hook experience.
Stitch length: Short, about 1.5–2mm. A short stitch catches every single horizontal stitch of the knitted piece and prevents cut loops from pulling out. A stitch that is too long leaves gaps through which stitches can slip. Two rows of straight stitch or a zigzag stitch are the most common options.
Important: Before sewing, lightly dampen and smooth the knitted piece so the rows lie straight.
Method 3: Hand stitches (Backstitch)
If you don’t have a sewing machine, you can also sew the securing stitches by hand – using a thin, sturdy yarn and a Tapestry Needle. Backstitch provides good security. Slightly slower than a sewing machine but comparable in quality.
Method 4: Norwegian Tradition (Felting)
With genuine, Non-Superwash yarns like Léttlopi or Rauma Finull, sometimes a simple securing by gently working in the edge is enough – the wool holds together naturally due to its felting tendency. This method is only reliable with suitable yarns and is not recommended for beginners.
Step by step: Cast on, secure, and cut the Steek
Step 1 – Plan the Steek zone
When knitting the project, typically 5–9 extra stitches are cast on for the Steek. These stitches form the cutting zone and do not contribute to the structure of the piece. They are often knitted in a contrast color or a neutral checkerboard pattern to make the cutting line clearly visible.
An odd number of stitches (5 or 7) always creates a clear center line – the middle stitch is the later cut.
Important: Never continue knitting the colorwork pattern in the Steek zone. Instead, "bridge" the colors in a simple checkerboard or stripe pattern – that is, regularly alternate the threads every 1–2 stitches. The reason: If a long float runs across the Steek zone and you cut this thread, it will simply pull out and take the tension of the adjacent stitches with it. Short, regularly interwoven threads, on the other hand, stay in place.
Step 2 – Securing
Choose your preferred method. Always secure both sides of the planned cut line – one securing line to the right and one to the left of the center line. The distance between the two securing lines determines how much edge remains after cutting.
For the crochet edge: work from bottom to top, stitch by stitch. For the machine seam: from bottom to top in an even straight stitch.
Step 3 – Cutting
Use sharp scissors. Small detail with big impact: Sharp scissors make a clean cut – dull scissors press the stitches together before cutting and can make the edge uneven.
Cut the center line of the Steek, between the two securing lines. Don’t hesitate – the cut should be smooth. If you hesitate, you won’t get a clean line.
Step 4 – Working in the edges
The remaining Steek scraps (the stitches between the cut and the actual knitting piece) are folded inward to the inside and loosely sewn down. This protects the edge and gives the finished piece a neat interior.
Optional: A crocheted or knitted band along the new opening. For a Cardigan, this is the front band with buttonholes.
Step 5 – Finishing
The opening is stable, clean, and ready for the next step: set-in sleeves, a zipper, or a button band.
When is a Steek worthwhile?
Whenever you want to knit in the round but need openings. Classic applications:
Sleeve openings on the Lopapeysa: Traditional Lopapeysa are knit as tubes, the sleeve openings are cut after knitting and the sleeves are knit in.
Cardigan front opening: Instead of knitting the sweater flat (which complicates colorwork), the sweater is knit in the round and the front opening is cut afterwards.
Neckline: Deeper necklines can be cut and shaped afterwards.
V-neck: Classic for some Nordic designs – the V-neck is shaped by a diagonal Steek cut.
Once understood and done once, you will no longer see Steeks as a risk, but as what they are: an elegant tool that fundamentally simplifies circular knitting of colorwork.
Read more: